How to Sell Online Courses on Your Own Website
To sell online courses from your own website, you need four parts that work together: a sales page with a clear offer, a checkout that pays into a payment account in your name, a rule that opens the course as soon as the payment is confirmed, and a plan for exceptions (refunds, discounts, the person who wants to pay by bank transfer). With those in place, a stranger can find your page at 2 a.m., pay, and start lesson one while you sleep.
Set them up in this order: decide what the buyer gets and on what terms, check how many sales cover your monthly costs, then build the page and connect payments. The last step is where most first launches break. The card is charged, the buyer sees a thank-you page, and the course stays locked because nothing told it that the money arrived.
Decide what the buyer gets and on what terms
Say you sell a sourdough baking course: six modules, 24 short videos and a printable feeding schedule for the starter. You want $129 for it. The course is the thing you made. What you put on sale is an offer: the course, a price and a length of access. One course can have several offers, and keeping the two apart pays off later, when you want a discount for past students or a cheaper version without touching the course.
For the sourdough course, a sensible first setup looks like this:
- Full course, $129, access with no end date.
- 90 days, $79, access closes after three months.
We'd launch with the first one alone. A second offer earns its place when you have a reason for it, such as people telling you the price is too high, or a cohort that starts on fixed dates. Two offers from day one means two prices to explain on the page, and some buyers who would have paid $129 will take $79.
Access length is a real decision. Lifetime access is the easiest to sell and costs you nothing extra when the lessons are recorded. Time-limited access fits a course that includes your time (homework review, live calls), because that time is what you are pricing. A monthly subscription fits a library that keeps growing, but only if your checkout can charge the card every month. Otherwise don't write "monthly" on the page.
If the course isn't built yet, start with how to create an online course.
How many sales cover your costs
Run the numbers before you design anything. When you sell from your own site, the costs are yours: the platform, a payment fee on every sale, ads, and the small tools around them. The calculator below starts with the sourdough example. Replace every value with your own.
Example inputs, to be replaced with yours: price $129, payment fee 4%, platform $80 a month, ads $600 a month, other costs $40 a month, $1.00 per visitor, 1 visitor in 100 buys.
| Line | Example result |
|---|---|
| Payment fee per sale | $5.16 |
| Net per sale | $123.84 |
| Monthly costs (platform, ads, other) | $720 |
| Sales needed to break even | 6 a month |
| Visitors needed at 1 buyer per 100 visitors | about 600 a month |
In plain words: $600 of ads brings about 600 visitors, they make six purchases, and six purchases pay for the ads and the platform with about $23 left over. That shows which number to move. At $159 the break-even drops to five sales. If the page converts 2 visitors in 100 instead of 1, the same ad budget brings twelve sales. Selling to an email list you already have, with no ads, changes the picture completely.
Two costs people forget. Refunds: if one buyer in twenty asks for their money back, you need that many more sales. Taxes: in the EU, VAT on digital products sold to consumers is generally charged at the buyer's country rate, and when you sell from your own site, you are the seller who owes it. Ask an accountant before you fix the price, and decide whether $129 includes tax.
What happens between the Buy button and lesson one
Every arrow in that chain is a place where a sale can get stuck. The checkout page shows what the buyer is getting, the total, a promo code field and the payment methods. Each extra field (address, "how did you hear about us") is a reason to close the tab, so ask for a name and an email and stop there.
The payment provider charges the card or wallet and holds the money in your account there. Then comes the step that matters most: the provider sends your site a confirmation in the background, called a webhook. That message is the only real proof of payment. A buyer arriving on your thank-you page proves nothing, since the bank may have declined the card a second later.
When the confirmation arrives, the platform marks the order as paid and opens the course. If that part is manual (you check your inbox and add students by hand), you lose buyers at night and on weekends.
Before launch, buy your own course with a test card or a small real payment and check that it opens under a fresh student account. Then refund it and check that access closes.
Prices, discounts and promo codes
Pick the price before designing the page, because the page has to justify it. How to price an online course covers the price itself. On the selling side, show the full price on the page and give discounts through promo codes. A code can expire, stop after 50 uses and apply to one offer, while a lower price printed on the page quietly becomes the real price. Past students and a partner's audience get a code or a personal payment link, not a public second price. And if you run a sale, keep its end date: a deadline that moves teaches your list to wait for the next one.
The sales page
A course sales page answers, roughly in this order: who it's for, what they'll be able to do afterwards, what's inside, the price and how long access lasts, the refund terms, and the questions people already ask you in messages. Then one button per offer. The course landing page guide goes through it block by block. Write the refund terms and a privacy policy page before launch, not after the first request.
Best platform to sell online courses: what to require
Search for "best platform to sell online courses" and you get rankings. A ranking doesn't know your country, how your buyers pay or how your taxes work, so check any platform against this list. Tick only what it does today, in its help docs or a demo.
- Payments land in your own account with the payment provider.
- It accepts the payment methods your buyers already use: card, PayPal, a local wallet.
- The course opens by itself once the provider confirms the payment.
- One course can be sold through several offers with different prices and access lengths.
- Promo codes with an end date, a usage limit and a limit to one offer.
- A refund closes access, by itself or with one action.
- You can send a payment link to someone who pays by invoice or asks in a chat.
- It is clear who handles tax: the platform, or you inside the price.
- You know the monthly cost at your expected sales, including any per-sale fee on top of the provider's.
If you're weighing Scholaxy against Teachable, Podia or Kajabi, the platform comparison lists each one's entry price and the fee it takes from a sale, as published on their own pricing pages in October 2026. For a wider look, see how to choose an online course platform. Whichever you pick, the test purchase is the check that counts.
Where selling from your own site goes wrong
- The course doesn't open after payment. Usually the product isn't linked to the course, or the access rules ignore buyers.
- The discount isn't applied. Some checkouts charge the offer's base price and ignore a discount set elsewhere, so test with a promo code too.
- The currency doesn't match. Some providers charge only in the account's local currency, so a price in dollars on an account in pesos fails.
- Nobody comes. With the example numbers you need about 600 visitors a month; if you are far from that, grow an email list first and sell to it.
- Too many choices. Three price columns with five differences between them send people away "to think about it".
How to set this up in Scholaxy
Scholaxy keeps courses, sales pages, payments and a CRM in one account. A new school runs free for its first 30 days and then needs a paid plan: enough time to build the sourdough offer and make the test purchase. The video shows the same screens as the steps below.
1. Create the product
As in the first section, the course and the offer are separate records. The product says what the buyer gets; the offer says how much and on what terms.
Open "SmartCRM", then "Products", and click "+ Add a product". Type the "Product name" and switch off "Create the first offer", otherwise you get an offer priced at 0 that you'll have to fix. Choose the type "Training access", pick the sourdough course in "The linked LMS course" and click "Create".
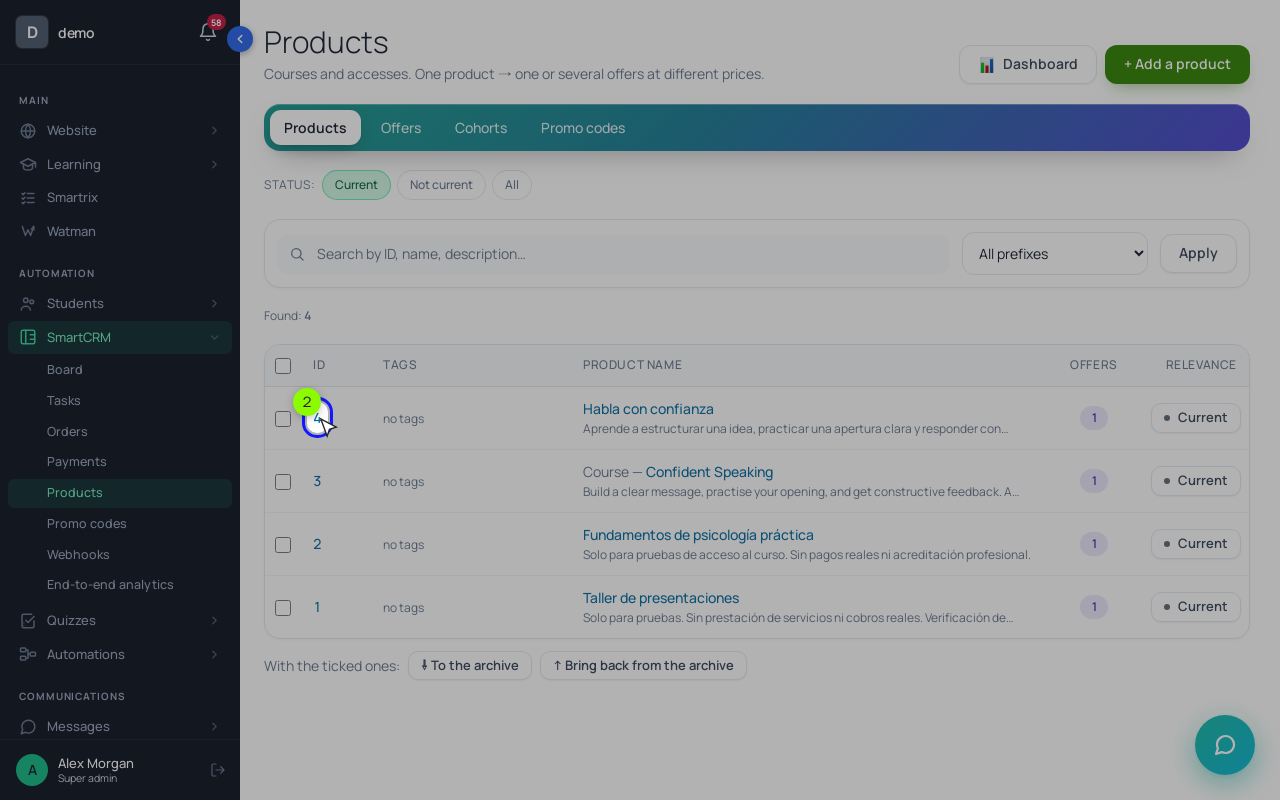
2. Add the offers
In the product card, click "+ Add an offer" and fill in the "Offer name", the "Access type" and the price. For the example: "Full course" at $129 with "No limits". The shorter version would be "Limited in time" with 90 in "The access term (days)".
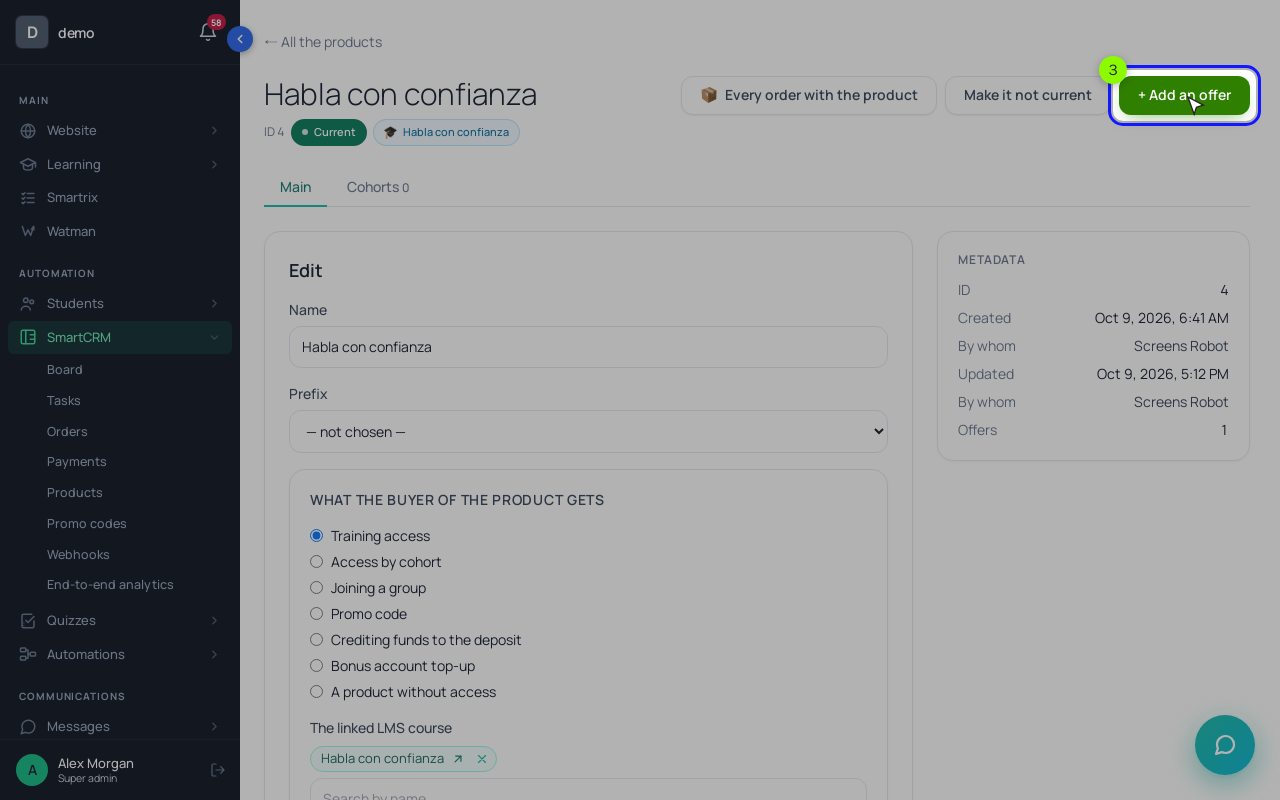
The price has three fields: "Original", "Discount" and "Final", with the currency next to the price. A new offer starts in the school's "Currency for new offers" ("Admin panel" → "System settings" → "Language and region"), and you can pick another currency for any offer. Nothing is converted: $129 stays $129.
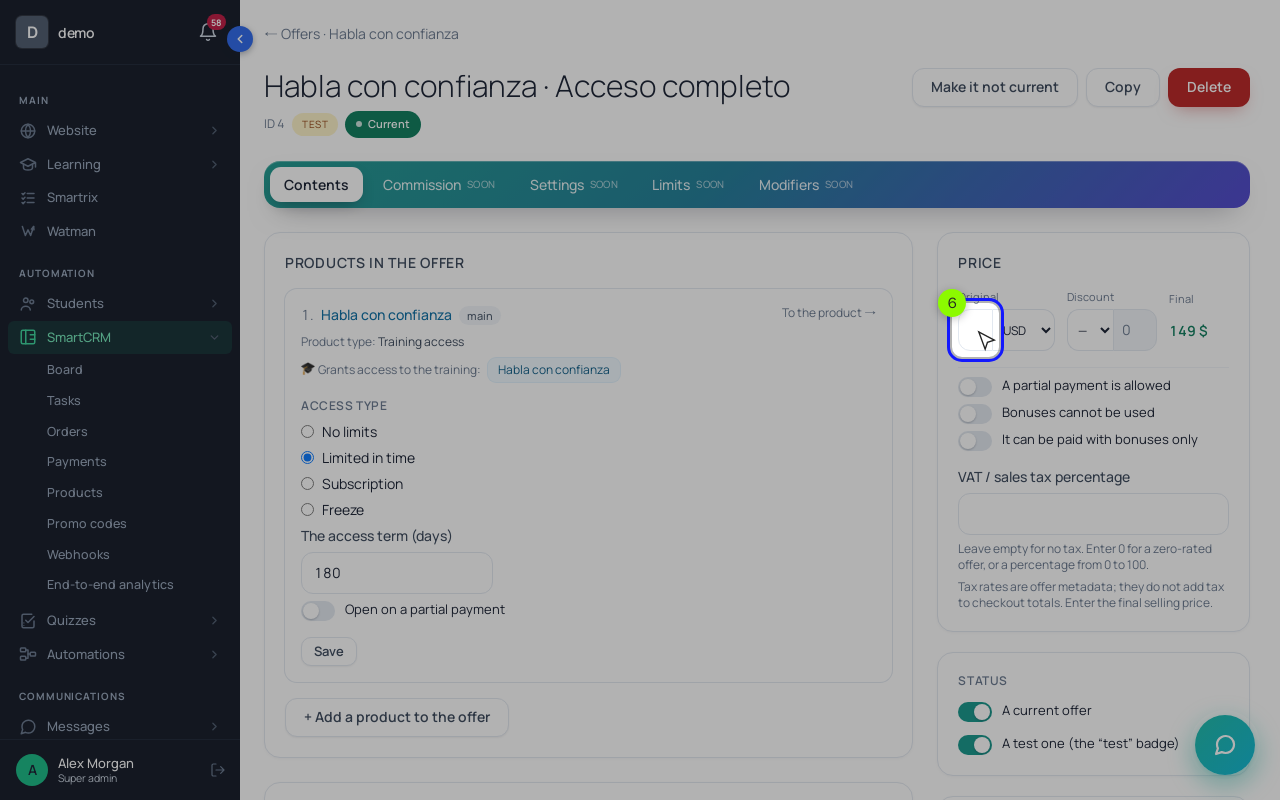
The VAT rate here is only a label: it isn't added to the price or sent to the payment provider, so the $129 must already include any tax you owe. The "Subscription" access type doesn't charge anyone monthly either; it gives a fixed term (30 days by default) that the next purchase extends. Monthly card charges are a separate feature, Stripe subscriptions.
3. Let buyers into the course
This step is the one people skip. Open the course, click "🔐 Access", choose "Restricted (by groups and/or buyers)", switch on "Buyers (there is a paid access to the training)" and click "Save the access". Without "Buyers", a paid order still leaves the course locked.
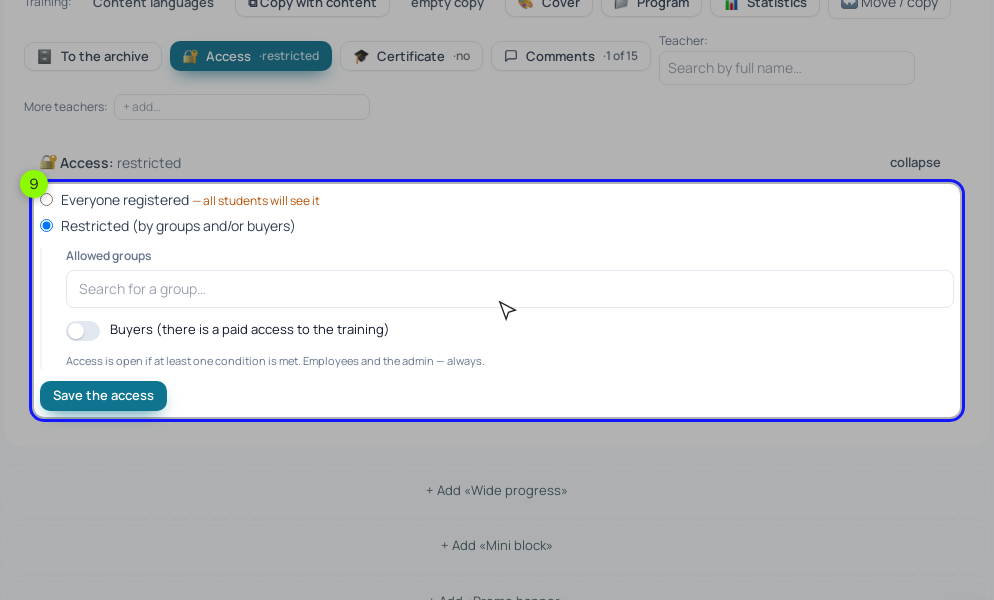
Then check the program the course belongs to. If its "Access" says "Open to everyone", every student sees the course, paid or not.
4. Connect payments
The money goes to your own Stripe, PayPal or Mercado Pago account. Enter the keys under "Admin panel", then "Integrations", and click "Save and check". Then open the checkout settings at /admin/integrations/checkout (the page isn't in the menu) and add a button with "+ Payment method". Stripe registers its webhook by itself; for PayPal and Mercado Pago you create the webhook in their dashboards. Mercado Pago charges only in the account's local currency, with no conversion, so the offer must be priced in that currency.
The checkout links to /p/privacy under the payment buttons, so publish a privacy page at that address.
5. Put the offer on the sales page
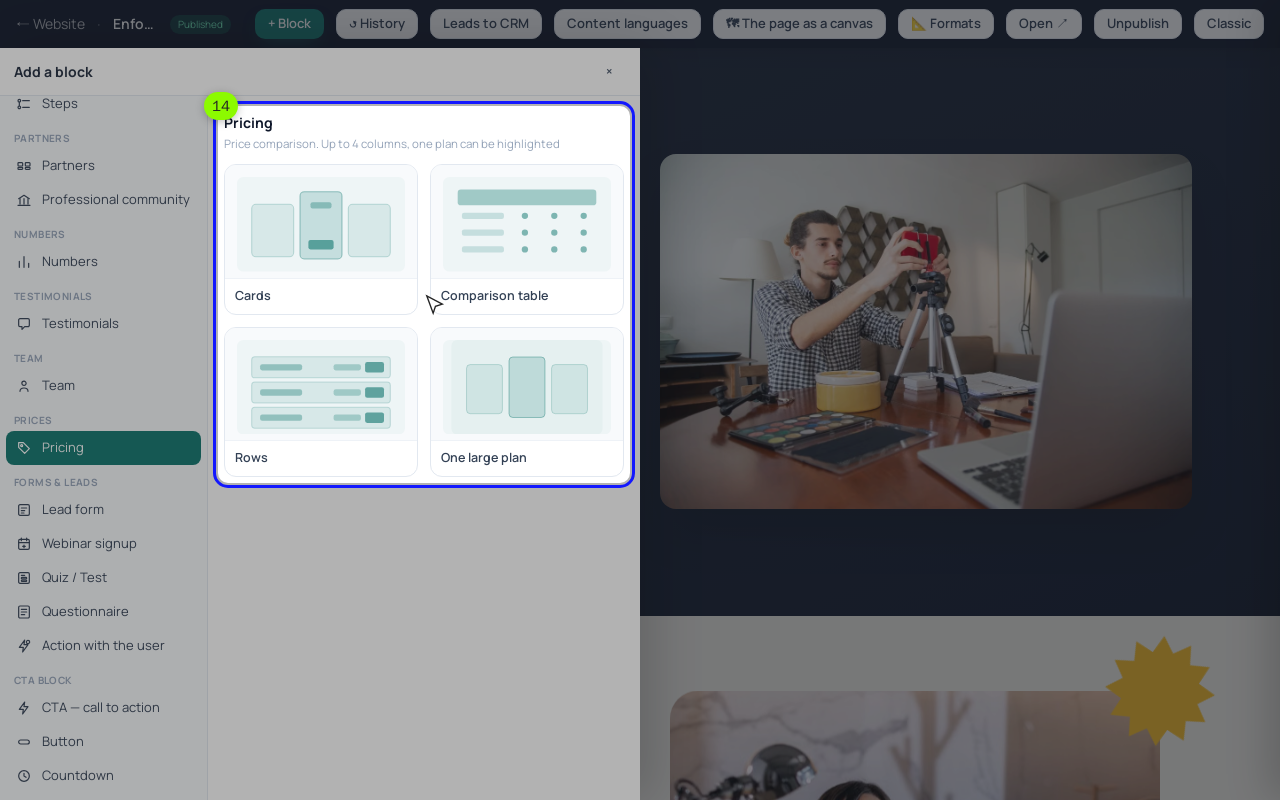
Create the page in "Website", then "Pages", then "+ New page". Click "+ Block", open the "Prices" category and add a "Pricing" block. In each column, choose an offer under "🛒 The product to sell": the button then leads straight to payment. Click "Publish" when the page is ready.
The website button charges the "Original" price. A "Discount" on the offer works only in orders created in the CRM, so for a public sale use a promo code: /crm/promocodes, then "+ New promo code", with a percent or a fixed amount, "Valid until" and "Max uses". The buyer types it into the "Promo code:" field on the payment page.
6. Make a test purchase and check the order
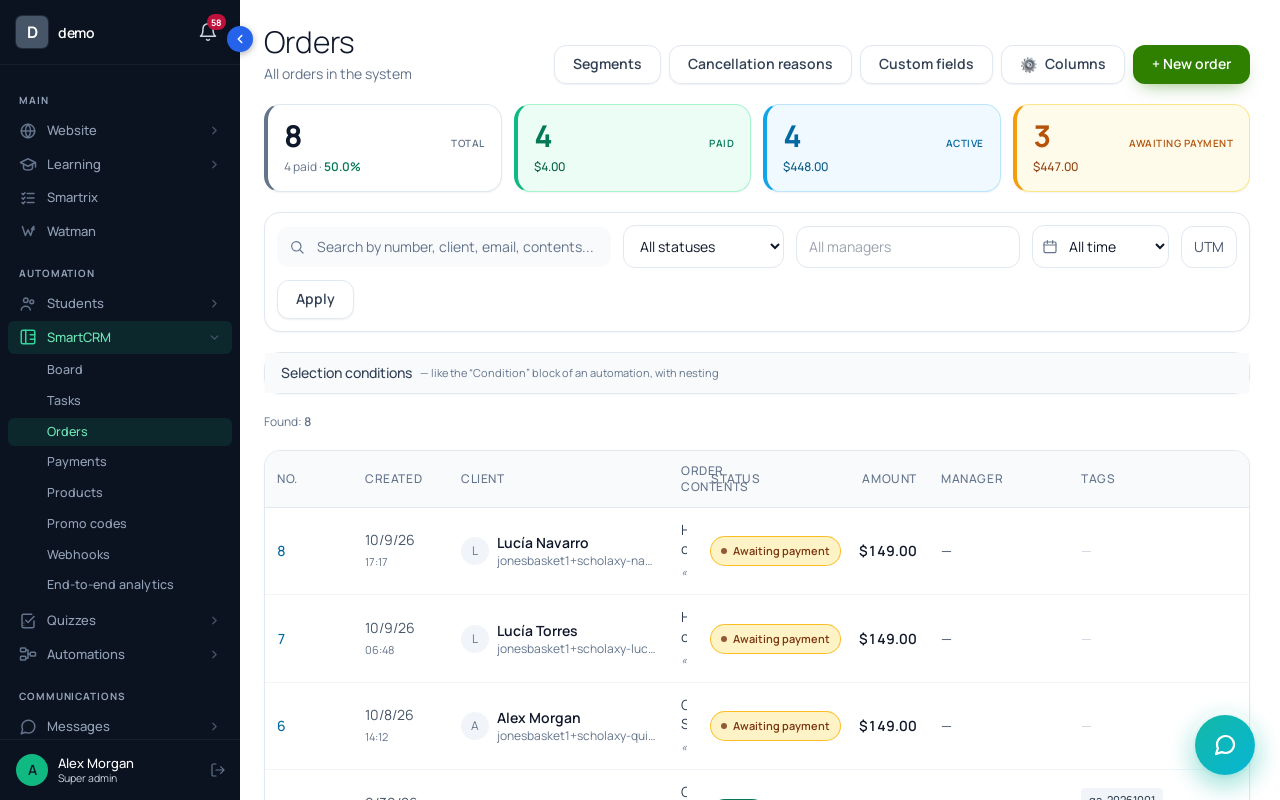
Connect Stripe with a test key (it starts with sk_test_) and buy your own offer. Until Stripe is connected, the payment page shows a yellow note saying the payment is only simulated. Then open "SmartCRM", then "Orders": the test order should be "Paid", and the student card should show the course in the "List of trainings" tab, "Active access" block.
Refunds depend on the provider. A full refund in PayPal or Mercado Pago closes access by itself. A Stripe card refund doesn't reach the order, so cancel the order with "Cancel →" and the reason "Refunded", and the course closes.
Can I sell a course without a website?
Yes, for the first few buyers. A payment link sent in a chat or by email works: in Scholaxy that's an order created by hand in "Orders" and its "📋 Copy the link" button. It doesn't scale, because every sale is a conversation.
Can students pay in installments?
Scholaxy has no separate installment plan. When a buyer pays in parts, keep one order and add each part as a "Received" payment. The order turns paid once the payments reach the total, so the course opens after the last part, not the first.
What to set up first
- Write down the one offer you'll launch with: price, access length, refund terms.
- Run your numbers in the calculator and note the visitors you need per month.
- Create the product and the offer, then switch on "Buyers" in the course access.
- Connect Stripe with a test key, add a payment method, publish the privacy page.
- Build the sales page with a "Pricing" block and publish it.
- Buy the course from a fresh account, check the order, refund it and check that access closes.
- Switch to the live key. A week after launch, compare real visitors and sales with your break-even line.